/https%3A%2F%2F33mag.com%2Fapp%2Fuploads%2F2012%2F11%2Fhow-shoot-proper-pov-footage-and-avoid-looking-guy-31301.png)
It's pretty clear to anyone who's stood in a lift-line in the past few years that POV-style filming is here to stay and judging by the number of cringe-worthy edits I see popping up on a daily basis, I think a large majority of people could use a few helpful tips on how to get the most from their helmet-cams.
There are plenty of choices of cameras out there, with GoPro and Contour being the two big players in the segment, but as long as you're using the latest generation of technology they're all capable of putting out some quality footage so I'm going to skip the camera review for now and get down to a few basic shooting tips. Follow these five tips and make your edits something that people are actually going to be stoked to watch and share with their friends.
1. Lock it down – Beware the dreaded camera shake and make sure wherever you end up mounting your camera, it is locked to it's mount solidly. Use those little rubber stoppers that come with Gopros or carry some Duct Tape around with you. This small act can make a world of difference.
2. Mix it up – Don't be afraid to pass the camera around amongst the crew throughout the day, mixing up riders and filming styles. Do a few runs where someone films static shots from the knuckle of the jump or in the trees to help keep it interesting for the viewer. Don't forget about lifestyle shots of all the other fun parts of the day besides just riding like the chairlifts, driving to the skatepark, food fights in the cafeteria or drawing on your passed-out buddies face on the ride home.
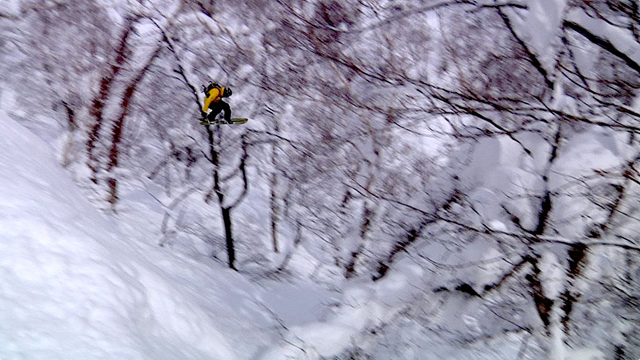
You and your crew can film each other and get tons of coverage for a more interesting edit like this shot of Dave Short in Japan. Credit: Dave Short
3. Get creative with mounting locations – When you put that camera on top of your forehead, you and your board will not be in the shot resulting in no frame of reference for your viewer. Experiment with all those sticky mounts that came with your camera. Put the camera on your board, on your chest, attached to your trucks somehow, on a pole, etc… Just think outside the box. And if you are going to put the camera on your helmet, attach it to your temple on your BACK foot, which will allow the lens to include the side of your head and hopefully at least half your body and board in the shot, instantly providing some interesting foreground and a frame of reference for your viewers.
4. Edit that shit! – Nothing is worse than a whole bunch of raw footage. Learn how to use a simple editing program like iMovie and present your footage to the world as a nice tight edit.
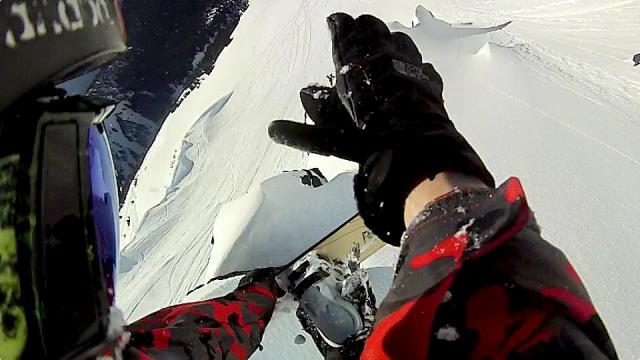
Dave Short captured this Method perfectly due to proper camera placement. Credit: Dave Short
5. Edit Tight – Shorter is better. We all know how excited you are about your dream vacation but no one on the planet has the patience to sit through 16 minutes of shaky footage. A general rule of thumb for web videos is keep it under 3 minutes. It might be painful to cut favourite clips but you really have to be critical while editing and only include the choicest of footage.
Here's a couple of tips from two of the top snowboarding POVers out there:
Try to only turn on your camera when you're turning on your "A" game or else you'll end up with way too much footage.
-Dave Short
My best advice for getting sick POV contour footage is make sure you have your angles and camera dialed. It seems the biggest problem people have is bad settings, bad angle, or forgetting to charge or turn on your camera. Oh yeah, make sure to get sendy!
-Andrew Burns
And an example of their work to enjoy:
Notice what I was talking about with the camera on the "back foot" side of Dave's head?
Burns in Alaska (oh yeah, new rule… Alaska = Automatic epic footage!)